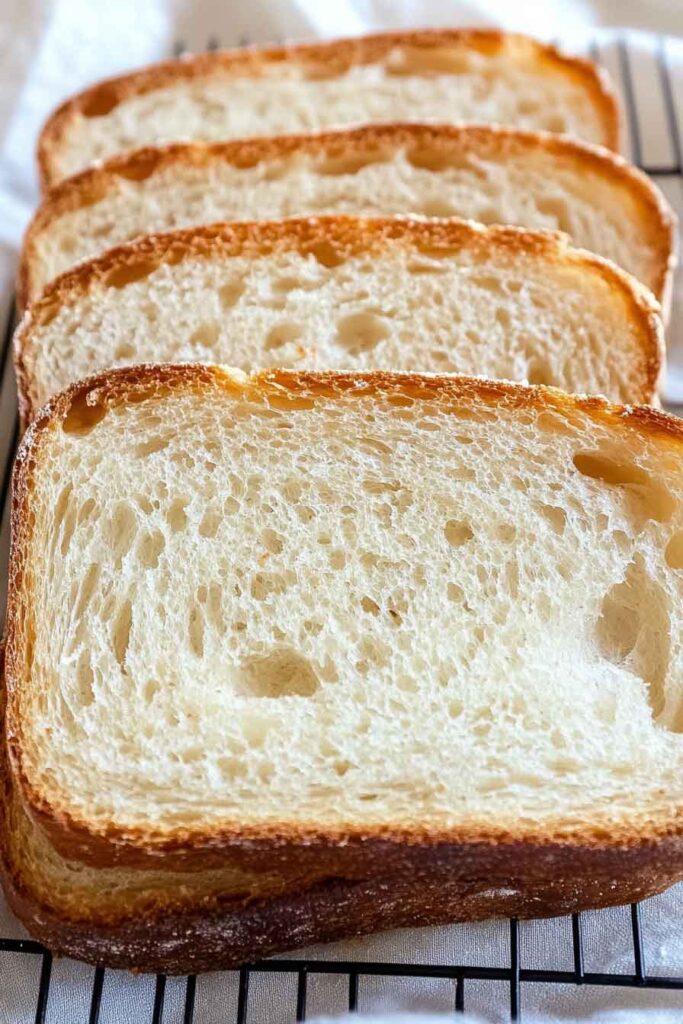
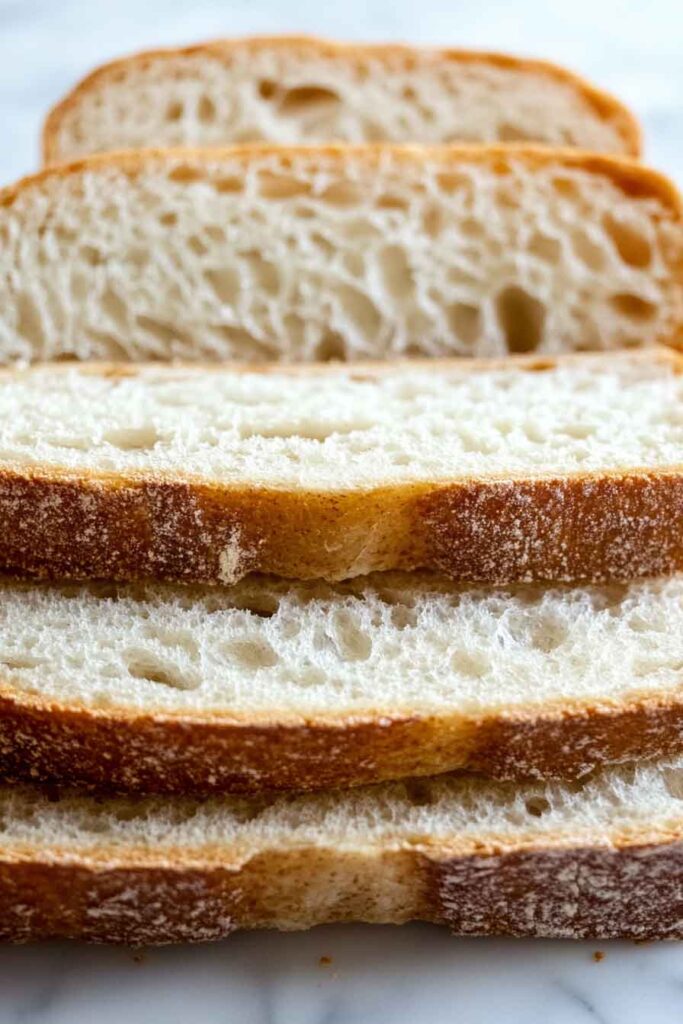
This Sourdough Discard Sandwich Bread is soft, fluffy, and perfect for everyday use. It’s a great way to use up extra starter without wasting a thing. The flavor is mild, the texture is tender, and it slices like a dream.
I started making it to cut down on food waste, and now I bake it weekly. It’s simple to mix, easy to rise, and works for toast, sandwiches, or just warm with butter. No sour tang—just homemade goodness in every loaf.
Perfect for beginner bakers or anyone with extra discard on hand. I’ll walk you through the whole process. It’s easy, practical, and so worth it.
Why You’ll Love This Recipe
- Smart Use of Discard: Turn what’s often thrown away into a loaf you’ll actually use all week.
- Consistent Texture: Thanks to instant yeast, this bread rises reliably with a soft, sandwich-friendly crumb.
- Subtle Sourdough Flavor: The discard adds a hint of tang without overpowering the loaf.
- Everyday Friendly: Slice it for breakfast, lunch, or dinner—it works with everything from peanut butter to tuna salad.
- No Special Gear Required: You can make it without a mixer or sourdough baking tools.

What You Need to Know Before You Start
Prep Time & Cook Time:
- Prep Time: 25 minutes (active)
- First Rise: 1.5–2 hours
- Second Rise: 45–60 minutes
- Bake Time: 35–40 minutes
- Total Time: About 4.5–5 hours, mostly hands-off
Yield:
1 standard loaf (8–10 slices). Easily doubled for batch baking.
Skill Level:
Beginner to intermediate. If you’ve made any yeast bread before, this will feel familiar. If not, the process is slow and forgiving—perfect for learning.
Flavor Profile:
Mild sourdough tang, rich crumb from milk and butter, and just a touch of sweetness from honey or sugar.
Required Kitchen Tools
You don’t need special equipment, but the right tools can make things easier.
- Mixing Bowls: One large for the dough, one small for warming liquids
- Loaf Pan: 8.5 x 4.5 inch or 9 x 5 inch
- Whisk or Fork: For combining wet ingredients
- Sturdy Spoon or Dough Whisk: For mixing dough
- Bench Scraper: Helpful for shaping and kneading
- Stand Mixer (Optional): Makes kneading faster, especially with sticky dough
- Plastic Wrap or Clean Kitchen Towel: For covering during rise
- Oven Thermometer (Optional): Helps verify baking temp if your oven is inconsistent
- Cooling Rack: Allows airflow to prevent soggy bottoms
Ingredients for Sourdough Discard Sandwich Bread
Exact quantities are in the recipe card, but here’s a deeper look at why each ingredient matters:
- Sourdough Discard (120g / ½ cup): Use unfed starter at room temperature. Even discard that’s been in the fridge for a few days works fine. It adds structure, mild acidity, and depth.
- All-Purpose Flour (360g / 3 cups): Gives the bread its soft, tender crumb. Bread flour can be used for a chewier texture.
- Warm Milk (240ml / 1 cup): Whole or 2% milk adds richness, tenderness, and flavor. Warm to around 100–105°F to help activate the yeast.
- Unsalted Butter (2 tbsp): Melted butter softens the crumb and enhances flavor. Can substitute with neutral oil.
- Honey or Sugar (1 tbsp): Feeds the yeast and gently sweetens the loaf without making it taste like dessert.
- Instant Yeast (2 tsp): Gives a reliable rise since discard alone can’t do all the work. Instant or active dry yeast both work; just activate dry yeast in the warm milk first.
- Salt (1½ tsp): Enhances the flavor and strengthens gluten structure.
Variations for Sourdough Discard Sandwich Bread
Want to tweak the loaf to fit your pantry or mood? Here are some ideas:
- Add Whole Wheat Flour: Replace 20–25% of the flour with whole wheat for more nutty flavor and fiber. You may need a splash more milk if the dough feels dry.
- Add Seeds or Grains: Mix in 1–2 tablespoons of flaxseeds, chia seeds, or sunflower seeds to boost nutrition and texture.
- Use Plant-Based Milk & Oil: Almond milk or oat milk work fine. Substitute coconut oil or olive oil for butter.
- Sweeter Loaf Option: Add another tablespoon of honey and a ½ tsp cinnamon for a slightly sweet loaf ideal for breakfast toast.
- Richer Bread: Add one egg during the mixing step for extra moisture and a softer, brioche-style crumb.
How to Make Sourdough Discard Sandwich Bread – Step-by-Step
Step 1: Warm the Liquid
In a small saucepan or bowl, warm the milk until it’s just lukewarm—not hot. Aim for 100–105°F (38–40°C). Stir in the melted butter and honey. This warm mixture helps wake up the yeast and makes the dough easier to knead.
If you’re using active dry yeast instead of instant, sprinkle it into the milk now and let it sit for 5–10 minutes until foamy before proceeding.
Step 2: Mix the Dough
In a large mixing bowl, add the sourdough discard. Pour in the milk mixture and stir to combine. Add the flour, yeast, and salt. Use a wooden spoon or dough whisk to mix until a shaggy dough forms. It should look rough and sticky, but not too wet.
If using a stand mixer, use the dough hook on low speed and mix until the dough pulls away from the bowl sides.
Step 3: Knead the Dough
Turn the dough out onto a lightly floured surface. Knead for 8–10 minutes by hand, using a fold-and-push motion. The dough should become smooth and elastic, though slightly tacky. If it sticks to your hands or counter, dust with just a little more flour.
With a stand mixer, knead on medium-low speed for about 6 minutes until the dough forms a soft, slightly tacky ball.
Step-by-Step Instructions (continued)
Step 4: First Rise (Bulk Fermentation)
Once the dough is kneaded, shape it into a rough ball. Lightly grease a large bowl with oil or nonstick spray and place the dough inside. Cover it with plastic wrap, a clean towel, or a reusable lid.
Let the dough rise in a warm, draft-free spot for 1.5 to 2 hours, or until it has doubled in size. If your kitchen is cool, you can set the bowl inside a turned-off oven with the light on for gentle warmth.
Tip: Don’t rush this step. The slow rise helps develop flavor and improves the dough’s structure.
Step 5: Shape the Dough
Once the dough has doubled, gently punch it down to release some gas. Turn it out onto a clean surface—no need for extra flour unless it’s very sticky.
Flatten the dough into a rectangle roughly 8 x 12 inches. Fold the short side over itself like a letter, then roll it up tightly into a log. Pinch the seam and tuck the ends under.
Place the log seam-side down into a greased 8.5 x 4.5 or 9 x 5-inch loaf pan.
Why this shape? Rolling the dough tightly ensures an even crumb and helps avoid large air pockets in the finished loaf.
Step 6: Second Rise (Proofing)
Cover the loaf pan loosely with plastic wrap or a clean towel. Let it rise again at room temperature for 45–60 minutes, or until the dough has risen about 1 inch above the rim of the pan.
You should be able to gently press a finger into the dough and see a slow bounce back—this is your sign that the dough is fully proofed and ready to bake.
If it springs back too quickly, give it more time. If it doesn’t spring at all and deflates, it may be over-proofed—bake immediately to salvage it.
Step 7: Bake the Bread
Preheat your oven to 375°F (190°C) about 15–20 minutes before baking.
Once fully proofed, place the loaf pan in the center rack of your preheated oven.
Bake for 35 to 40 minutes, rotating the pan halfway through. The top should be golden brown, and the loaf should sound hollow when tapped.
Optional: For a shinier crust, brush the top with milk or melted butter before baking.
Step 8: Cool the Bread
Remove the pan from the oven and let the loaf rest inside the pan for 5 minutes.
Then carefully turn it out onto a wire rack. Let the bread cool completely (at least 1 hour) before slicing. This prevents gummy or compressed slices.
Tip: Warm bread smells amazing, but cutting too early ruins the crumb structure.
Serving and Decoration
There’s no need for decoration here, but this bread serves beautifully:
- Sliced with butter or jam
- As sandwich bread for turkey, grilled cheese, or egg salad
- Toasted with peanut butter or honey
- Cubed for croutons or strata
- Turned into French toast with eggs, cinnamon, and milk
It’s an everyday loaf you’ll find new uses for constantly.
Storing Sourdough Discard Bread
- Room Temperature: Store in an airtight bag or bread box for up to 3–4 days. Avoid refrigeration—it speeds up staling.
- Freezing: Slice and freeze in a zip-top bag for up to 2 months. Toast from frozen or thaw at room temperature.
- Reheating Tips: To refresh slices, toast lightly or warm in a low oven.
Tips and Tricks for Success
- Weigh Your Ingredients: For best results, use a digital kitchen scale. Even slight variations in flour or discard weight can affect texture.
- Don’t Skip the Second Rise: This step ensures a tall, airy loaf that won’t collapse in the oven.
- Check Your Yeast: If using dry yeast, make sure it’s not expired. Inactive yeast = flat loaf.
- Avoid Over-Flouring: Sticky dough is normal. Resist adding too much extra flour while kneading.
- Cool Before Slicing: Cutting hot bread compresses the crumb and can make it gummy. Let it rest fully.
Nutrition
| Nutrient | Per Slice (1 of 10) |
|---|---|
| Calories | 165 |
| Carbohydrates | 28g |
| Protein | 5g |
| Fat | 4g |
| Saturated Fat | 2g |
| Fiber | 1g |
| Sugar | 2g |
| Sodium | 240mg |
| Iron | 1.5mg |
| Calcium | 50mg |
Note: Nutritional values are estimates and vary based on ingredients and serving sizes.
Sourdough Discard Sandwich Bread
Course: Breakfasts4
servings30
minutes40
minutes160
kcalIngredients
½ cup (120g) sourdough discard, unfed and room temperature
3 cups (360g) all-purpose flour
1 cup (240ml) warm milk (100–105°F)
2 tbsp unsalted butter, melted
1 tbsp honey or sugar
2 tsp instant yeast (or 2¼ tsp active dry yeast)
1½ tsp salt
Directions
- Warm the Milk: In a small saucepan or microwave-safe bowl, warm the milk until lukewarm. Stir in the melted butter and honey.
- Mix the Dough: In a large bowl, combine sourdough discard, milk mixture, flour, yeast, and salt. Stir until a shaggy dough forms.
- Knead: Knead by hand for 8–10 minutes or in a stand mixer for 5–6 minutes until smooth and slightly tacky.
- First Rise: Place dough in a greased bowl. Cover and let rise in a warm spot for 1.5–2 hours until doubled.
- Shape: Punch down and shape dough into a tight loaf. Place in a greased 8.5 x 4.5-inch or 9 x 5-inch loaf pan.
- Second Rise: Cover loosely and let rise again for 45–60 minutes, or until dough rises 1 inch above pan rim.
- Bake: Preheat oven to 375°F (190°C). Bake 35–40 minutes until golden brown and hollow-sounding when tapped.
- Cool: Rest in the pan for 5 minutes, then transfer to a wire rack to cool completely before slicing.
Sourdough Discard Bread FAQs
Can I use active sourdough starter instead of discard?
Yes, though the flavor may be slightly stronger. Use the same quantity and skip additional yeast if your starter is well-fed and active.
Can I make this recipe without yeast?
You can try, but it will take much longer to rise (up to 8+ hours), and results can vary based on your starter strength.
What can I do if my dough didn’t rise?
Make sure your yeast is active and your room is warm enough. If needed, place the dough in a turned-off oven with the light on to create a warm environment.
Can I make this dough ahead of time?
Yes, after the first rise, refrigerate the shaped loaf overnight. Let it come to room temp and finish rising before baking.
How long does it stay fresh?
This bread is best the first 2–3 days. After that, slice and freeze for longer storage.
Conclusion
If you’ve ever felt guilty tossing your sourdough discard, this soft sandwich bread is the perfect solution. It delivers all the comfort of homemade bread—tender crumb, light crust, and gentle sour flavor—without needing sourdough mastery. It fits neatly into everyday life and works just as well for breakfast toast as it does for a lunch sandwich or dinner side.
Once you try it, it might just become your new weekly go-to.