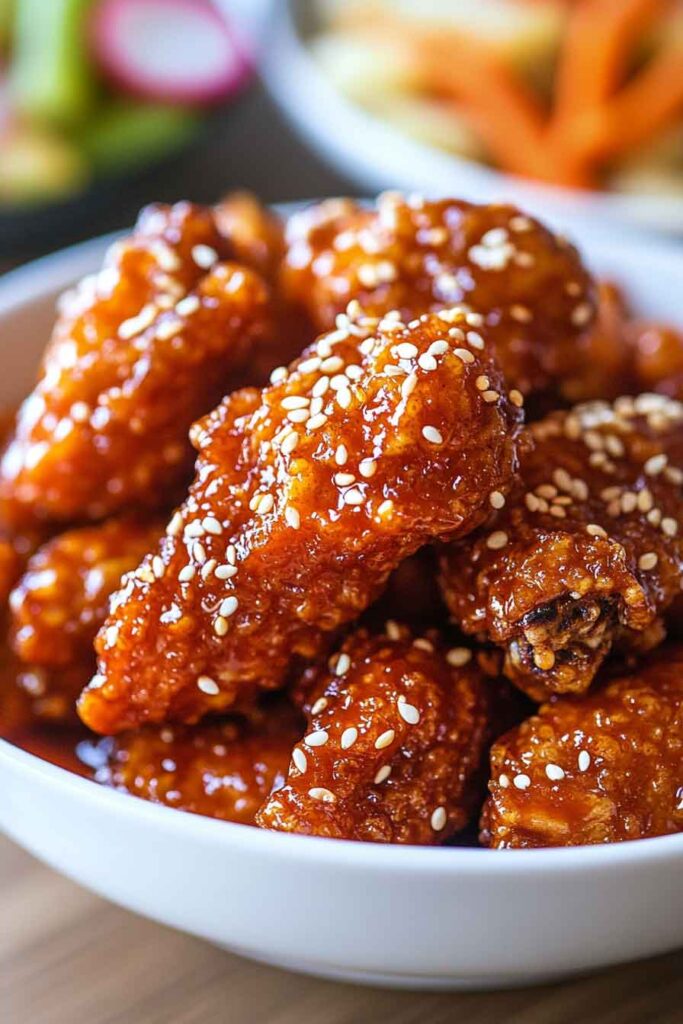
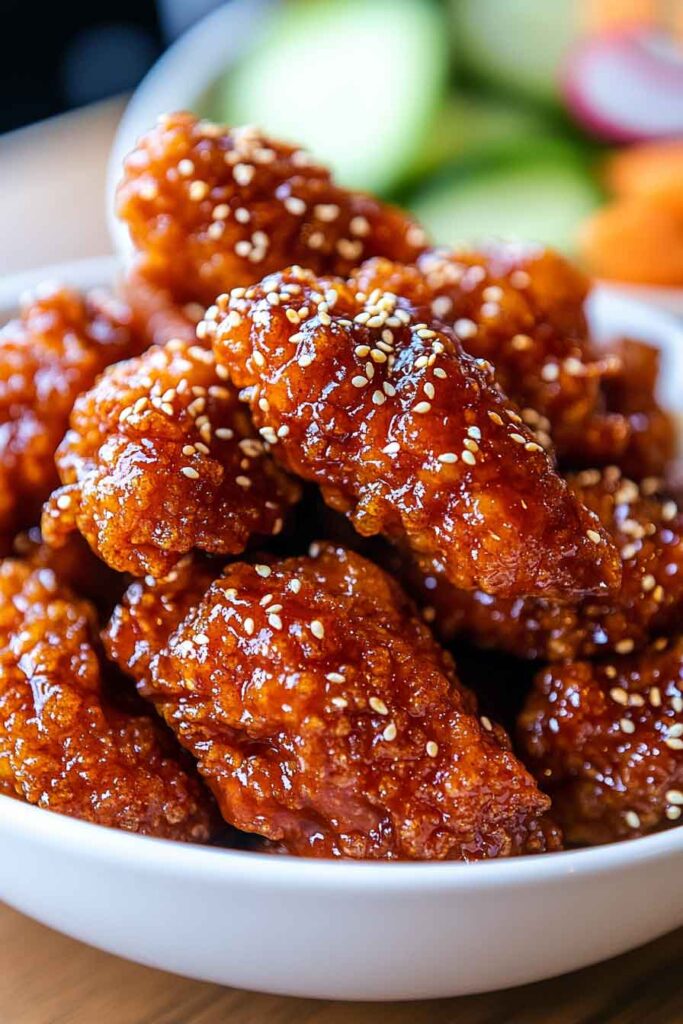
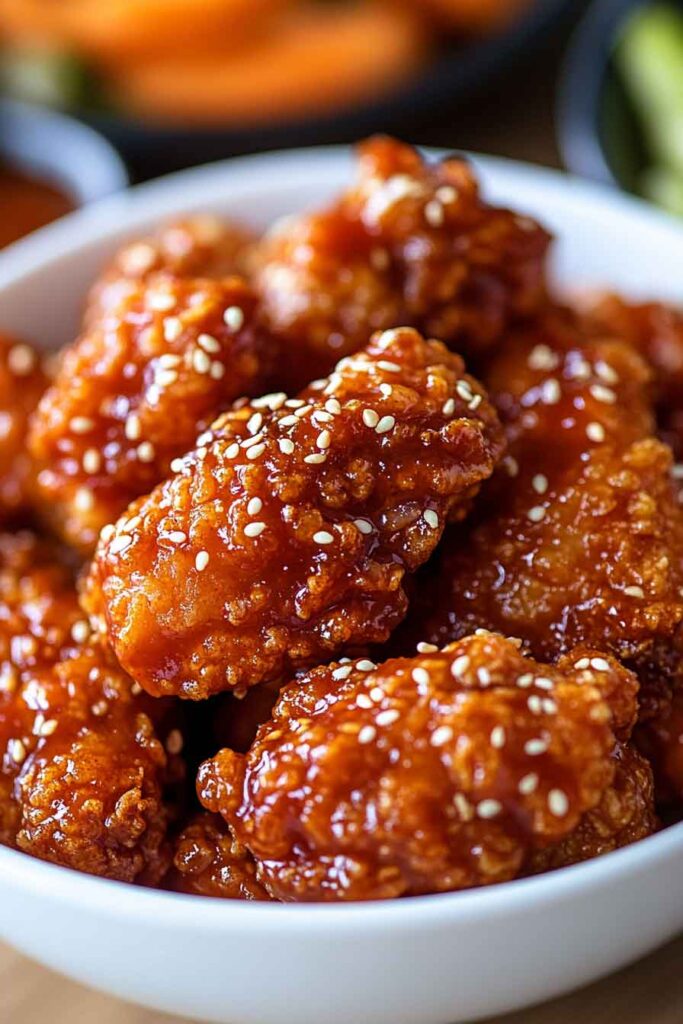
Okay, this chicken? It’s next-level crispy. Like, crunch-you-can-hear kind of crispy.
Then it gets coated in the sweet, spicy, sticky yangnyeom sauce. Oh wow. The flavor explosion is unreal. I couldn’t stop licking my fingers.
If you’ve never tried Korean fried chicken before, this is the recipe to start with. Seriously. Let’s make it together—you’re gonna love it!
Why You’ll Love This Recipe
- Unbeatable Crunch: The double-frying method renders out excess moisture and fat, creating an exceptionally crisp, almost glassy coating.
- Flavor Explosion: From the nutty gochujang and sweet rice syrup to soy, garlic, and vinegar, the sauce delivers in layers—nothing artificial or overpowering.
- Cook Once, Wow Always: Once you master the method, it becomes your go-to for parties, game days, or anytime you crave a fried chicken upgrade.
- Flexible and Forgiving: You can adjust the sauce’s heat, use boneless cuts, or even batch the sauce in advance for quicker weeknight meals.
- Restaurant Quality at Home: Skip the pricey delivery fees—this version rivals what you’d get at top-tier Korean chicken joints.
What You Need to Know Before You Start
Prep Time: 20–25 minutes
Cook Time: 40–50 minutes
Total Time: ~1 hour 15 minutes (including rest time between fries)
Servings: Serves 4 generously as a main, or 6–8 as an appetizer/snack.
Spice Level: Medium to hot, but customizable.
Difficulty Level: Moderate — ideal for home cooks ready to try multi-step frying.
Note from the Chef: Timing is everything here. The chicken must cool slightly between fries to retain its structure and crispness. The sauce should be warm but not boiling when tossing. Trust the process—it’s worth the attention.
Required Kitchen Tools
To ensure crispy success, gather the following:
- Large mixing bowls – for seasoning, dredging, and battering the chicken.
- Wire rack and baking sheet – essential for draining fried chicken without steaming it.
- Deep-frying pot or heavy Dutch oven – wide and deep enough to handle oil safely.
- Candy/fry thermometer – accuracy matters for crisping without burning.
- Slotted spoon or tongs – for safe handling of hot oil.
- Saucepan – for simmering the Yangnyeom glaze.
- Whisk – for emulsifying the sauce without clumping.
Pro Tip: Set up a “frying station” with your dry/wet batters on one side and draining rack on the other. It keeps the workflow clean and stress-free.
Ingredients for Korean Fried Chicken (Yangnyeom Style)
Below is your complete list—measured for balance, texture, and bold Korean flavor. Every component plays a role.
For the Chicken
- 2 lbs chicken wings and drumettes – Look for small to medium-sized pieces for even cooking. Avoid overly large wings as they take longer to crisp.
- Oil for deep frying – Peanut, canola, or any neutral oil with a high smoke point.
- 1 tsp toasted sesame seeds – For garnish; adds aroma and visual appeal.
Chicken Seasoning (Pre-batter Dry Rub)
- 1½ tsp kosher salt – To season the meat before battering.
- 1 tsp garlic powder – Adds savory depth and aroma.
- ½ tsp freshly ground black pepper – A mild bite to cut the richness.
- 1 tbsp cayenne pepper (optional) – Brings extra heat; can be reduced or skipped if desired.
Tip: This dry seasoning not only flavors the meat but helps the batter grip the skin better.
Dry Batter (First Layer)
- ½ cup potato starch – Potato starch gives that signature crispness and slightly crackly texture. Cornstarch is a backup, but not quite the same.
- ¼ cup all-purpose flour – For structure and binding.
- 1 tsp chicken bouillon powder – Adds umami to the crust (optional but recommended).
- 1 tsp salt – Enhances seasoning in the crust.
- 1 tbsp cayenne pepper (optional) – Spice in the crust = extra flavor depth.
Wet Batter (Second Layer)
- ½ cup potato starch
- ¼ cup all-purpose flour
- 1 egg – Helps create a slightly puffed but crisp outer layer.
- 1 tsp baking powder – For airiness and lightness.
- ½ cup cold club soda (or cold water) – The cold temp helps the batter puff on contact with hot oil, resulting in a crunchier finish.
Chef’s Note: Wet batter should be thick enough to cling but not gloppy. Whisk gently—don’t overmix or it’ll turn gummy.
Yangnyeom Sauce (Korean Sweet-Spicy Glaze)
This is what makes the dish unforgettable. Sweet, spicy, sticky, glossy—this sauce is the soul of Yangnyeom Chicken.
- ¼ cup ketchup – Adds tang, color, and sweetness.
- ¼ cup extra spicy gochujang – Korean fermented red chili paste. It’s sweet, funky, spicy, and deeply savory.
- ¼ cup rice syrup – Traditional Korean sweetener that adds shine and stickiness. Sub with corn syrup or honey if unavailable.
- ¼ cup water – To thin the sauce just slightly.
- 3 tbsp soy sauce – Brings salt and depth.
- 3 tbsp sugar – Balances the spice.
- 2 tsp plum vinegar – Light acidity that keeps the sauce from being cloying. Rice vinegar also works.
- 1 tsp gochugaru – Korean chili flakes. Bright, mild heat with a hint of smokiness.
- 1 tbsp neutral oil – For sautéing.
- 3 garlic cloves, minced – Don’t skip this. Fresh garlic blooms the flavor of everything else.
Make Ahead Tip: You can make this sauce up to 4 days in advance. Store in the fridge and reheat gently before using.
How to Make Korean Fried Chicken (Yangnyeom Chicken) – Step-by-Step Instructions
This dish is built in layers—from well-seasoned chicken to a crispy double fry, all sealed in with the glossy Yangnyeom glaze. Follow each phase carefully for the best texture and flavor.
1. Prep the Chicken
- Clean & Pat Dry
Rinse chicken wings and drumettes under cold water. Pat them completely dry using paper towels. Excess moisture will cause dangerous splattering during frying and prevent the batter from sticking. - Season
In a large bowl, toss the chicken with:- 1½ tsp salt
- 1 tsp garlic powder
- ½ tsp black pepper
- 1 tbsp cayenne pepper (optional)
Mix thoroughly and let rest while you prepare the batters.
Chef’s Note: Seasoning the meat first, rather than relying solely on the sauce or crust, makes every bite more flavorful.
2. Make the Dry Batter
In a shallow bowl, combine:
- ½ cup potato starch
- ¼ cup all-purpose flour
- 1 tsp chicken bouillon powder
- 1 tsp salt
- 1 tbsp cayenne pepper (optional)
Tip: Coat each wing lightly in the dry mixture first to help the wet batter adhere.
3. Prepare the Wet Batter
In a medium bowl, whisk together:
- ½ cup potato starch
- ¼ cup all-purpose flour
- 1 egg
- 1 tsp baking powder
- ½ cup cold club soda (or water)
The batter should be slightly thick but still able to coat the back of a spoon.
Pro Tip: Mix just until smooth. Overmixing will develop gluten and make the crust tough.
4. Batter the Chicken
- Lightly dredge the chicken in the dry batter, shaking off the excess.
- Then dip each piece into the wet batter, allowing excess to drip off.
- Place battered pieces on a wire rack to rest while you heat the oil.
5. Heat the Oil
- Fill a deep pot or Dutch oven with 2–3 inches of neutral frying oil.
- Heat oil to 325°F (165°C). Use a candy or fry thermometer to ensure accuracy.
Safety Tip: Never overcrowd the pot. Fry in small batches to maintain consistent temperature.
6. First Fry (325°F)
- Gently lower the battered chicken into the hot oil in batches.
- Fry for 6–8 minutes, turning occasionally until pale golden and crisp.
- Remove using a slotted spoon and drain on a wire rack set over a baking sheet.
Rest: Let the fried chicken rest for 10–15 minutes. This crucial break lets the crust firm up and the internal moisture redistribute.
7. Second Fry (375°F)
- Increase oil temperature to 375°F (190°C).
- Return the chicken to the oil in batches and fry for 2–3 minutes until deep golden brown, ultra-crispy, and sizzling.
Drain again on a wire rack. The crust should sound crisp when tapped.
Why Double Fry? The first fry cooks the chicken through and sets the crust. The second fry crisps it to perfection and drives out residual oil.
8. Make the Yangnyeom Sauce
In a saucepan over medium-low heat:
- Add 1 tbsp neutral oil and 3 minced garlic cloves. Sauté until fragrant, about 1 minute.
- Stir in:
- ¼ cup ketchup
- ¼ cup gochujang
- ¼ cup rice syrup
- ¼ cup water
- 3 tbsp soy sauce
- 3 tbsp sugar
- 2 tsp plum vinegar
- 1 tsp gochugaru
- Whisk constantly over low heat until smooth and slightly thickened—about 3–5 minutes. The sauce should be glossy and pourable, not runny.
Pro Tip: Don’t overcook or boil the sauce. It will thicken further as it cools slightly.
9. Sauce and Toss
- In a large clean bowl, gently toss the hot, double-fried chicken in the warm Yangnyeom sauce until well coated.
- Plate immediately and sprinkle with toasted sesame seeds.
Chef’s Tip: For maximum crispness, sauce just before serving. If holding for a while, keep chicken and sauce separate until ready to toss and serve.
How to Serve Korean Fried Chicken (Yangnyeom Chicken)
This dish is bold, beautiful, and deserves to be the star of any spread. Here’s how to serve it in both casual and composed ways:
📌 Classic Korean Style
- With Pickled Radish (Chikin-Mu): The sharp crunch and tang of pickled daikon balances the rich, spicy-sweet chicken perfectly.
- Ice-Cold Beer (Maekju): A traditional pairing in Korea—”chimaek” (chicken + maekju) is a beloved food culture.
- Plain Rice: Short-grain white rice or sticky rice helps mellow the strong flavors.
📌 Entertaining Platter
- Pile chicken on a large tray or serving board.
- Garnish with scallions, sesame seeds, and sliced chili peppers.
- Add small bowls of dipping sauces (extra Yangnyeom, soy garlic, or gochujang mayo).
📌 In a Bowl
Layer chicken over:
- Steamed jasmine or sticky rice
- Shredded cabbage or fresh slaw
- Pickled veggies
- Drizzle with extra sauce and top with scallions or cilantro
How to Store Korean Fried Chicken
Storage Guidelines
- Refrigerator: Store sauced chicken in an airtight container for up to 3 days.
- Freezer (Un-sauced): Freeze only the crispy, un-sauced chicken pieces. Reheat and toss with fresh sauce.
Reheating Tips
- Oven: Bake at 375°F (190°C) for 10–12 minutes. Place on a wire rack to maintain crispness.
- Air Fryer: Reheat at 350°F (175°C) for 6–8 minutes.
- Microwave (last resort): Expect loss of crispness; use only for small portions.
💡 Pro Tip: For next-day enjoyment, save extra sauce separately and re-glaze the chicken after reheating.
Tips & Tricks for Success
- Use Potato Starch, Not Cornstarch: Potato starch delivers a more delicate and crispy crust that holds up under sauce.
- Rest Between Fries: Cooling the chicken after the first fry is essential for extra crunch.
- Control the Oil Temperature: Invest in a reliable thermometer—fluctuations cause soggy results.
- Sauce Gently: Don’t drown the chicken; just enough to coat each piece is perfect.
- Gochujang Brands Matter: Some are sweeter, some spicier. Taste-test and adjust sugar or chili levels accordingly.
- Pre-make the Sauce: It keeps in the fridge for several days and speeds up the process next time.
Nutrition Facts (Per Serving – 4 servings total)
| Nutrient | Amount |
|---|---|
| Calories | 540 kcal |
| Total Fat | 30g |
| Saturated Fat | 5g |
| Trans Fat | 0g |
| Cholesterol | 115mg |
| Sodium | 1080mg |
| Total Carbohydrates | 41g |
| Dietary Fiber | 1g |
| Sugars | 17g |
| Protein | 28g |
| Vitamin C | 6% DV |
| Iron | 12% DV |
| Calcium | 4% DV |
Note: These values are estimated based on standard ingredient quantities and may vary based on portion size and ingredient brands.
Korean Fried Chicken Yangnyeom Chicken
Course: Dinners4
servings25
minutes45
minutes540
kcalIngredients
- For the Chicken
2 lbs chicken wings and drumettes
Oil for deep frying (peanut, canola, or vegetable)
1 tsp sesame seeds (for garnish)
- Chicken Seasoning
1½ tsp salt
1 tsp garlic powder
½ tsp black pepper
1 tbsp cayenne pepper (optional)
- Dry Batter
½ cup potato starch
¼ cup all-purpose flour
1 tsp chicken bouillon powder
1 tsp salt
1 tbsp cayenne pepper (optional)
- Wet Batter
½ cup potato starch
¼ cup all-purpose flour
1 egg
1 tsp baking powder
½ cup cold club soda (or cold water)
- Yangnyeom Sauce
¼ cup ketchup
¼ cup spicy gochujang
¼ cup rice syrup (or honey)
¼ cup water
3 tbsp soy sauce
3 tbsp sugar
2 tsp plum vinegar (or rice vinegar)
1 tsp gochugaru
1 tbsp neutral oil
3 garlic cloves, minced
Directions
- Season chicken with salt, garlic powder, black pepper, and cayenne. Let rest.
- Mix dry batter ingredients in a shallow bowl.
- Make wet batter by whisking potato starch, flour, egg, baking powder, and cold soda.
- Coat chicken lightly in dry batter, then dip in wet batter. Let rest briefly.
- First fry at 325°F for 6–8 minutes. Drain on wire rack and let cool.
- Second fry at 375°F for 2–3 minutes until golden brown and extra crisp.
- Prepare sauce: Sauté garlic in oil. Add remaining sauce ingredients and simmer 3–5 minutes.
- Toss chicken in warm sauce. Serve immediately with sesame seeds on top.
Korean Fried Chicken FAQs
Can I make this recipe without gochujang?
Yes, though it changes the character. For a milder version, replace gochujang with a mix of chili garlic sauce and a bit of miso or soy sauce for umami.
Why is my batter falling off during frying?
The chicken may have been too wet, or oil temperature fluctuated. Always dry chicken well and maintain a steady fry temp between 325–375°F.
Is Yangnyeom Chicken extremely spicy?
Not inherently. It has heat, but it’s mellowed by sugar and ketchup. Adjust gochugaru and cayenne to suit your preference.
Can I use boneless chicken?
Absolutely! Boneless thighs work best for retaining juiciness. Just reduce cooking time slightly to prevent overcooking.
Can this be made ahead?
You can prepare the sauce ahead and even fry the chicken once in advance. Just re-crisp with the second fry before serving.
Conclusion
There’s something almost ceremonial about biting into freshly glazed Korean Fried Chicken. The crisp. The heat. The sweet tang. Yangnyeom Chicken isn’t just another fried dish—it’s a multi-textured, flavor-layered experience that deserves center stage at your table.
With just a bit of prep and the right method, you can bring authentic Korean street food vibes straight to your kitchen. Whether you serve it with pickled radish or over a rice bowl, it’s hard to go wrong.
Give it a go—and don’t be surprised if this becomes a permanent part of your weekend rotation.