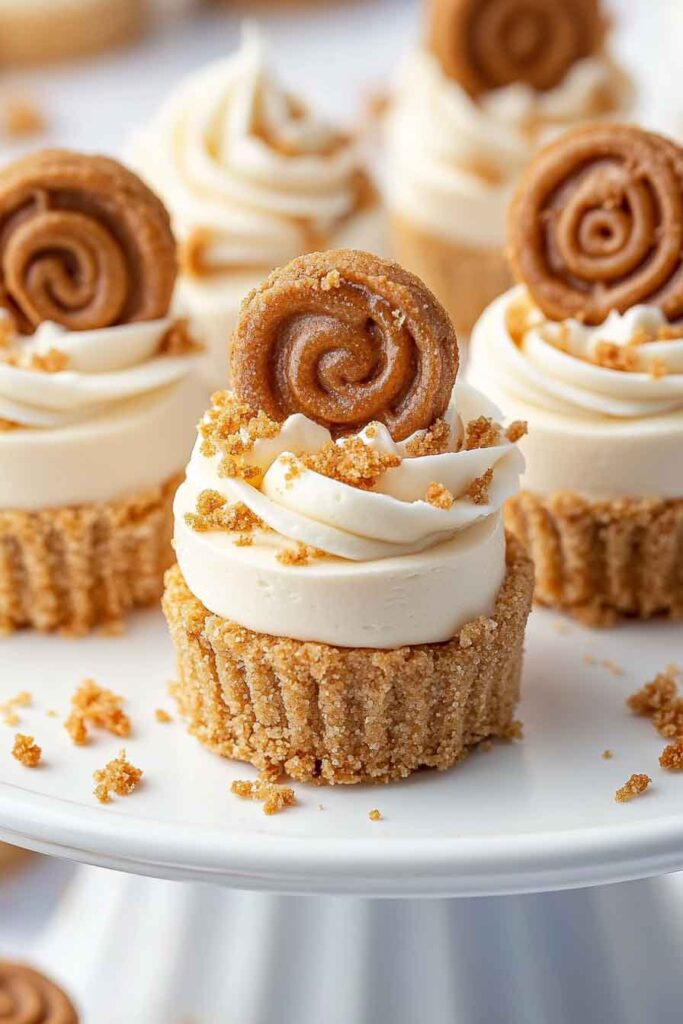
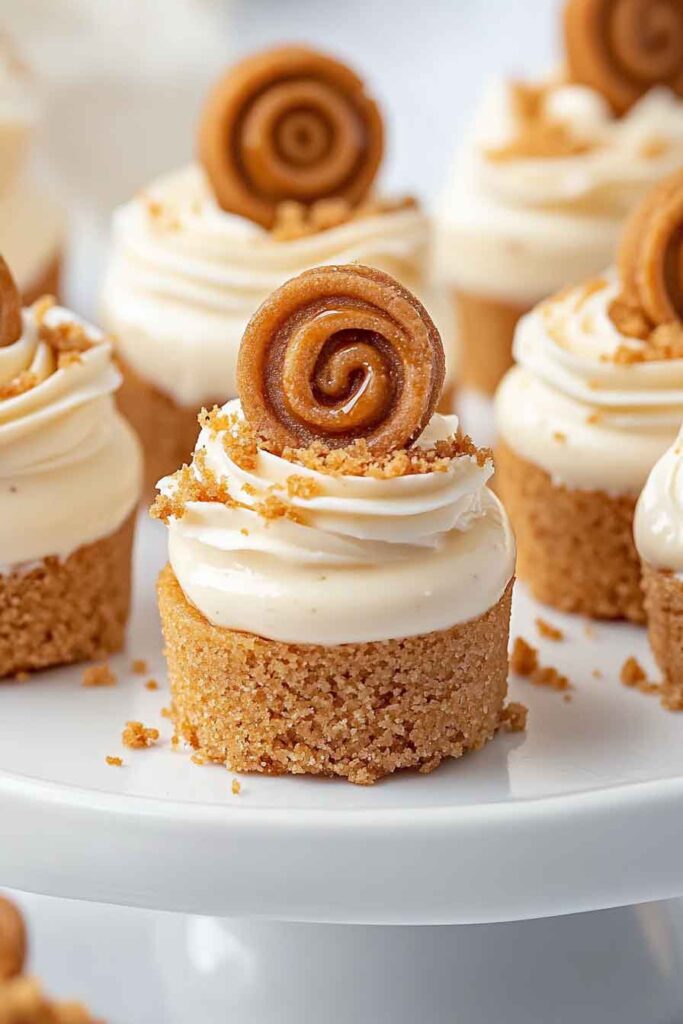
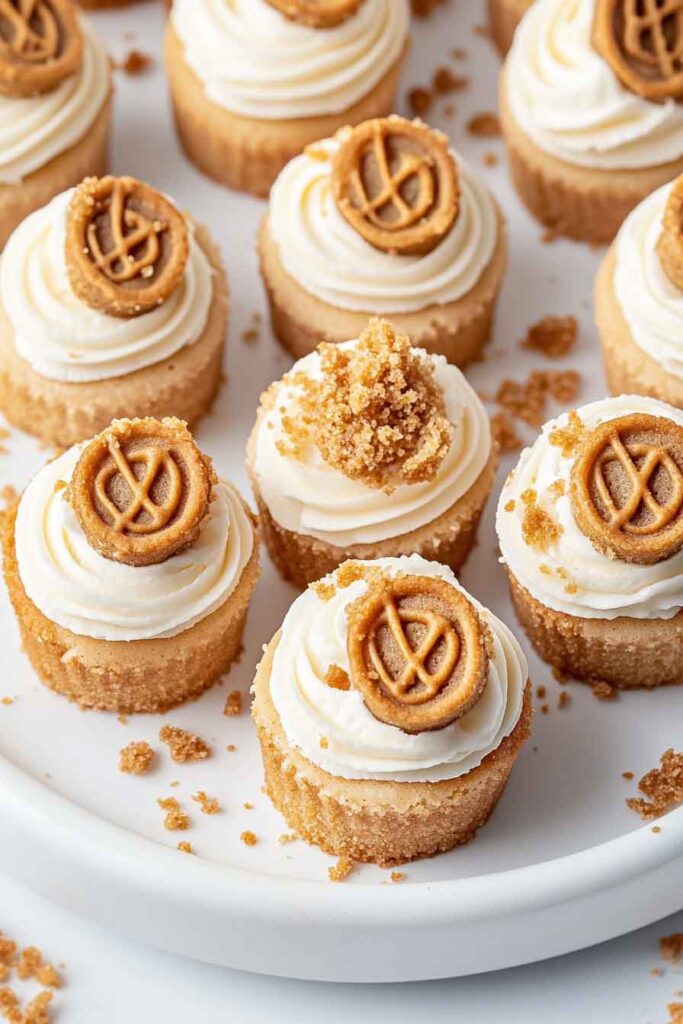
Alright, these mini Biscoff cheesecakes? They’re creamy, rich, and packed with that deep, spiced cookie butter flavor in every bite. Built on a buttery Biscoff crust and topped with more cookie goodness—yeah, they’re pretty irresistible.
I made them for a get-together when I wanted something easy but still impressive. Crushed up Biscoff cookies for the base, whipped up a smooth cream cheese filling with a swirl of cookie butter, and baked them in a muffin pan. Chilled ‘em, topped with more Biscoff spread—and they vanished fast.
They’re no-fuss, perfectly portioned, and make the ideal sweet bite when you want something a little fancy without all the work. Let’s make a batch—you’ll be hooked after the first one.
Why You’ll Love This Recipe
- Balanced Texture in Every Bite: The base is buttery and slightly crisp, the filling is smooth and fluffy, and the topping adds a soft glaze with a delicate crunch from crushed cookies.
- Full Biscoff Experience: Both the crust and filling are made with Biscoff cookies and cookie butter spread, delivering consistent flavor throughout.
- No-Bake Convenience: The recipe requires no oven time. It’s chilled to set, making it approachable even if you’re new to making cheesecake.
- Great for Gifting or Events: Individual cheesecakes are tidy, easy to plate, and portable. Perfect for birthdays, baby showers, or holidays.
- Make-Ahead Approved: These cheesecakes need to chill for at least 4 hours (preferably overnight), so you can prep them the day before serving.
What You Need to Know Before You Start
Prep Time & Chill Time
- Prep Time: About 25–30 minutes. This includes making the crust, whipping the filling, and assembling.
- Chill Time: Minimum 4 hours to set properly. Overnight chilling will give the best texture and flavor.
- Total Time: Roughly 4 hours and 30 minutes, mostly hands-off.
Serving Size
This recipe yields 12 mini cheesecakes, each made in a standard muffin tin using cupcake liners. They’re just the right size for individual portions—satisfying without being too heavy.
Skill Level
Easy. No baking or water baths needed. You’ll just need to crush, mix, whip, and layer. A stand or hand mixer makes things quicker, but the recipe is also doable with just a whisk and some patience.
Required Kitchen Tools
To ensure smooth preparation, gather the following tools:
- 12-cup Muffin Tin: Standard size, used to shape the cheesecakes.
- Paper Cupcake Liners: Prevent sticking and make it easy to remove each mini cheesecake.
- Mixing Bowls: At least two—one for the crust and one for the filling.
- Electric Mixer (Hand or Stand): Essential for achieving a light, fluffy filling.
- Silicone Spatula: Great for folding whipped cream into the filling without deflating it.
- Food Processor or Rolling Pin: To crush the Biscoff cookies into fine crumbs for the crust.
- Measuring Cups and Spoons: For accurate portioning.
- Microwave-Safe Bowl or Small Saucepan: To gently melt the cookie butter topping.
Ingredients for Mini Biscoff Cheesecakes
Here’s a deeper look at what makes each layer work. All amounts will be detailed in the recipe card at the end.
For the Crust:
- Biscoff Cookie Crumbs (about 20 cookies): The spiced, caramel-like flavor of Biscoff cookies sets the tone for the entire dessert. Crush them finely for a firm base—either with a food processor or by sealing them in a zip bag and rolling with a pin.
- Granulated Sugar: Just a tablespoon or two to help the crust hold its shape and add light sweetness.
- Salted Butter, Melted: Helps bind the crumbs while adding a rich buttery note. Salted butter enhances the sweet-spice balance and gives depth.
For the Cheesecake Filling:
- Full-Fat Cream Cheese: Softened to room temperature for easier blending. Avoid low-fat varieties—they tend to produce a watery or grainy texture.
- Powdered Sugar: Dissolves quickly and keeps the filling smooth and lump-free.
- Biscoff Spread (Cookie Butter): The heart of the flavor—this spread adds warmth, spice, and creamy sweetness.
- Pure Vanilla Extract: Rounds out the spices and enhances the sweetness without overpowering.
- Heavy Whipping Cream: Whipped separately and folded in last. This is what makes the filling light and mousse-like instead of dense.
For the Topping:
- Biscoff Spread (melted): When gently warmed, it becomes glossy and pourable, perfect for topping each mini cheesecake.
- Optional Biscoff Cookie Garnish: A sprinkle of crushed cookies or half a cookie pressed gently into the top adds texture and a beautiful finishing touch.
Variations for Mini Biscoff Cheesecakes
- Chocolate Swirl: Add 2–3 tablespoons of melted dark chocolate into the filling for a marbled look and flavor.
- Layered with Caramel: Drizzle store-bought or homemade caramel between crust and filling for a richer experience.
- Lemon Zest Twist: Add a little fresh lemon zest to the filling to brighten the flavor and contrast the richness.
- Nutty Crunch: Sprinkle chopped toasted pecans or almonds on top for an extra crunch.
- Jar Presentation: Build them in mini jars instead of muffin tins for a portable and elegant party option.
How to Make Mini Biscoff Cheesecakes – Step-by-Step Instructions
1. Prepare the Crust
- Line the Pan: Place paper cupcake liners into all 12 cups of a standard muffin tin. This prevents sticking and allows for easy removal.
- Crush the Cookies: Add Biscoff cookies to a food processor and pulse into fine crumbs. If you don’t have a processor, place cookies in a sealed plastic bag and roll with a rolling pin until fine.
- Mix the Crust: In a bowl, stir together the cookie crumbs, granulated sugar, and melted butter until the mixture resembles wet sand.
- Portion and Press: Evenly divide the crumb mixture among the 12 liners (about 1.5 tablespoons each). Use the back of a spoon or a small flat-bottomed glass to firmly press the crumbs into an even, compact layer.
- Chill the Crust: Place the tin in the fridge or freezer while you prepare the filling. This helps the crust firm up before layering.
2. Make the Cheesecake Filling
- Soften the Cream Cheese: Let it sit at room temperature for about 30–45 minutes. This ensures a smoother texture and easy blending.
- Beat the Cream Cheese: Using a stand mixer or hand mixer, beat the cream cheese on medium speed until smooth and lump-free—about 2–3 minutes.
- Add Sweeteners and Flavor: Add the powdered sugar, Biscoff spread, and vanilla extract. Beat again until fully combined and smooth. Scrape down the sides to ensure even mixing.
- Whip the Cream Separately: In another bowl, whip the cold heavy cream on high speed until stiff peaks form (about 2–3 minutes).
- Fold Gently: Use a spatula to gently fold the whipped cream into the cream cheese mixture in two additions. This step gives the filling a light, mousse-like texture. Fold until just combined—do not overmix or it will deflate.
3. Assemble the Mini Cheesecakes
- Spoon the Filling: Divide the filling evenly among the crusts. Spoon or pipe the mixture into each cup, filling nearly to the top.
- Smooth the Tops: Use a small offset spatula or the back of a spoon to level and smooth the surface.
- Chill to Set: Cover the muffin tin loosely with plastic wrap and refrigerate for at least 4 hours, or overnight for best results. This chilling time allows the filling to set into a creamy, sliceable texture.
Serving and Decoration
How to Serve Mini Biscoff Cheesecakes
Once the cheesecakes have fully chilled and set, they’re ready to be finished and served:
- Make the Topping: Warm the Biscoff spread in a microwave-safe bowl for 20–30 seconds until it’s smooth and pourable. Stir well.
- Add the Topping: Spoon about 1 teaspoon of the melted cookie butter onto each mini cheesecake and spread it gently across the top using the back of a spoon.
- Garnish (Optional): Finish with a sprinkle of crushed Biscoff cookies or gently press half a cookie into the topping for presentation.
- Unmold and Serve: Carefully peel back the cupcake liners. Serve chilled. For extra neat presentation, use a paper towel to wipe any edges clean before plating.
Storing Mini Biscoff Cheesecakes
Refrigerator:
Once fully chilled and topped, place leftover cheesecakes in an airtight container. They’ll stay fresh in the fridge for up to 4 days. For best texture, serve them straight from the fridge.
Freezer:
You can also freeze the cheesecakes without the topping. Place them (still in their liners) on a tray and freeze until solid. Then, transfer to a freezer-safe container or zip-top bag. Freeze for up to 2 months. Thaw in the refrigerator overnight, then top before serving.
Tips and Tricks for Success
- Room Temperature Cream Cheese: Cold cream cheese results in lumps. Let it sit out long enough to fully soften before beating.
- Stiff Whipped Cream is Key: Whipping the cream to stiff peaks ensures a stable, airy filling.
- Don’t Skip the Chill Time: The cheesecakes need at least 4 hours in the fridge to set properly. Overnight is even better.
- Use a Cookie Scoop or Piping Bag: For neat and even filling portions, especially helpful if making these for events.
- Customize the Topping: Drizzle with melted chocolate, swirl in caramel, or finish with a dusting of cinnamon sugar for variety.
Nutrition
| Component | Per Cheesecake |
|---|---|
| Calories | 330 kcal |
| Total Fat | 24g |
| Saturated Fat | 14g |
| Cholesterol | 65mg |
| Sodium | 140mg |
| Carbohydrates | 24g |
| Sugar | 18g |
| Protein | 3g |
| Fiber | <1g |
Nutrition estimates are approximate and may vary based on ingredients used.

Mini Biscoff Cheesecakes
Course: Breakfasts12
mini cheesecakes30
minutes330
kcal4
hourIngredients
For the Crust:
1 ½ cups (150g) Biscoff cookie crumbs (about 20 cookies)
2 tablespoons (25g) granulated sugar
5 tablespoons (70g) salted butter, meltedFor the Filling:
16 oz (450g) cream cheese, softened
¾ cup (90g) powdered sugar
½ cup (120g) Biscoff spread
1 teaspoon vanilla extract
¾ cup (180ml) heavy whipping creamFor the Topping:
⅓ cup (80g) Biscoff spread, melted
Optional: extra crushed Biscoff cookies or whole cookies for garnish
Directions
- Line a 12-cup muffin pan with cupcake liners.
- Combine cookie crumbs, sugar, and melted butter in a bowl. Mix until well combined. Divide evenly between liners and press firmly. Chill while preparing the filling.
- In a large bowl, beat the cream cheese until smooth. Add powdered sugar, Biscoff spread, and vanilla. Mix until fully combined.
- In a separate bowl, whip the heavy cream to stiff peaks. Gently fold into the cheesecake mixture in two additions until smooth and airy.
- Spoon or pipe the filling into the prepared crusts. Smooth the tops. Chill for at least 4 hours or overnight.
- Before serving, warm the Biscoff spread and spoon over each cheesecake. Garnish with cookie crumbs or half a cookie if desired. Serve cold.
Mini Biscoff Cheesecakes FAQs
Can I make this in a large pan instead of muffin cups?
Yes, you can press the crust into a springform pan and follow the same steps for the filling and topping. Chill overnight and slice to serve.
Is it okay to use store-brand cookie butter?
Absolutely. While Biscoff brand has the most classic flavor, other cookie butter brands will also work well.
Can I make this dairy-free?
It’s possible, but results vary. Use dairy-free cream cheese, coconut cream for whipping, and a dairy-free butter substitute. Texture may be softer.
Do I need gelatin to make this set?
No gelatin is needed. The whipped cream gives the filling structure, and the chill time ensures firmness without needing additional stabilizers.
Conclusion
These Mini Biscoff Cheesecakes strike the perfect balance between cozy flavor and creamy indulgence. They’re incredibly easy to make, chill beautifully for parties, and deliver that signature spiced cookie taste in every bite. Whether you’re entertaining guests or treating yourself to something special, this no-bake dessert is a reliable go-to that never feels overdone.