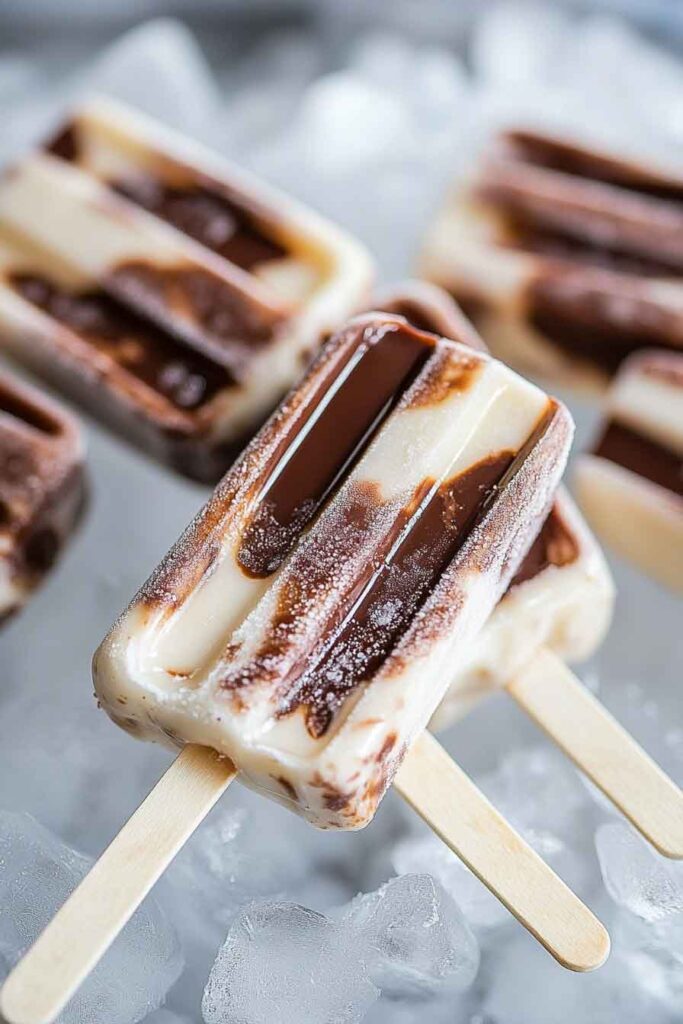
Alright, these Jello pudding pops? They’re cold, creamy, and take you straight back to childhood with that sweet, silky bite. Super easy to make and perfect for hot days or after-dinner treats.
I made them one summer afternoon when I wanted something fun but quick. Just whisked together instant pudding mix and milk, poured it into molds, and froze them. A few hours later—smooth, frozen pudding on a stick. So simple, so good.
They’re great for kids, but honestly? Grown-ups love them too. If you want a no-bake, no-fuss dessert that always hits the spot, these pudding pops are a must. Let’s freeze a batch—you’re gonna want extras.
Why You’ll Love This Recipe
- Brings Back Childhood Memories: These homemade pudding pops are a throwback to store-bought versions that used to be sold in freezer aisles but are now harder to find.
- Only Three Ingredients: All you need is instant pudding mix, milk, and a freezer. No need for extra sugar or eggs.
- Super Versatile: You can mix and match pudding flavors, layer them, or swirl them for fun visual appeal. Add-ins like cookie crumbles or berries can take it up a notch.
- Kid and Parent Approved: Children love the flavor and texture, while parents love how easy and budget-friendly they are.
- Freezer-Friendly: Make a batch and keep them stored for up to a month—ready whenever a sweet craving strikes.
What You Need to Know Before You Start
Prep Time & Freeze Time:
- Prep Time: 10 minutes
- Freeze Time: At least 6 hours (overnight recommended for best texture)
- Total Time: ~6 hours and 10 minutes
These pops need time to firm up properly. While they’ll be frozen after 4 hours, the texture improves the longer they set. Overnight freezing ensures a firmer, more cohesive pop that doesn’t melt too quickly.
Serving Size & Yield:
This recipe makes 8 full-size popsicles using standard 3-ounce molds. If using mini molds or paper cups, you may get up to 12 smaller pops.
Skill Level:
Beginner-friendly. No stove, oven, or special tools required—just a bowl, a whisk, and a freezer.
Texture Note:
These won’t be icy like fruit-based popsicles. Instead, they’re creamy—thanks to the pudding base—yet still hold their shape out of the mold. The key is using whole milk for the best texture. Lower-fat milk will yield slightly icier pops.
Required Kitchen Tools
You don’t need much to make pudding pops at home, but a few basic tools will make the process smooth:
- Mixing Bowls: One for each pudding flavor
- Measuring Cups: For milk and add-ins if using
- Whisk or Electric Hand Mixer: To fully blend the pudding and milk
- Popsicle Molds: Standard plastic molds work best. Silicone molds or paper cups also work—just add wooden sticks.
- Freezer-Safe Tray or Shelf Space: Make sure the pops can sit upright and flat while freezing
Tip: If using paper cups, cover them with foil and insert the stick through the center before freezing. This keeps the stick straight.
Ingredients for Jello Pudding Pops
Here are the ingredients you’ll need for two-flavor pudding pops (chocolate and vanilla). You can cut this in half to make just one flavor.
- 1 (3.9 oz) box Chocolate Instant Jell-O Pudding Mix
- 1 (3.4 oz) box Vanilla or White Chocolate Instant Jell-O Pudding Mix
- 4 cups cold whole milk, divided (2 cups per flavor)
Why These Ingredients Matter:
- Instant Pudding Mix: You must use instant pudding, not the cook-and-serve kind. Instant pudding sets with cold milk and thickens quickly.
- Whole Milk: For the best creamy texture. Skim or plant-based milk may not allow the pudding to set properly, especially for freezing.
- Flavor Options: You can switch in butterscotch, pistachio, banana cream, or cookies & cream pudding flavors depending on your preference.
Flavor Variations and Customization Ideas
These pudding pops are easy to make your own. Try one of these variations if you want to mix things up:
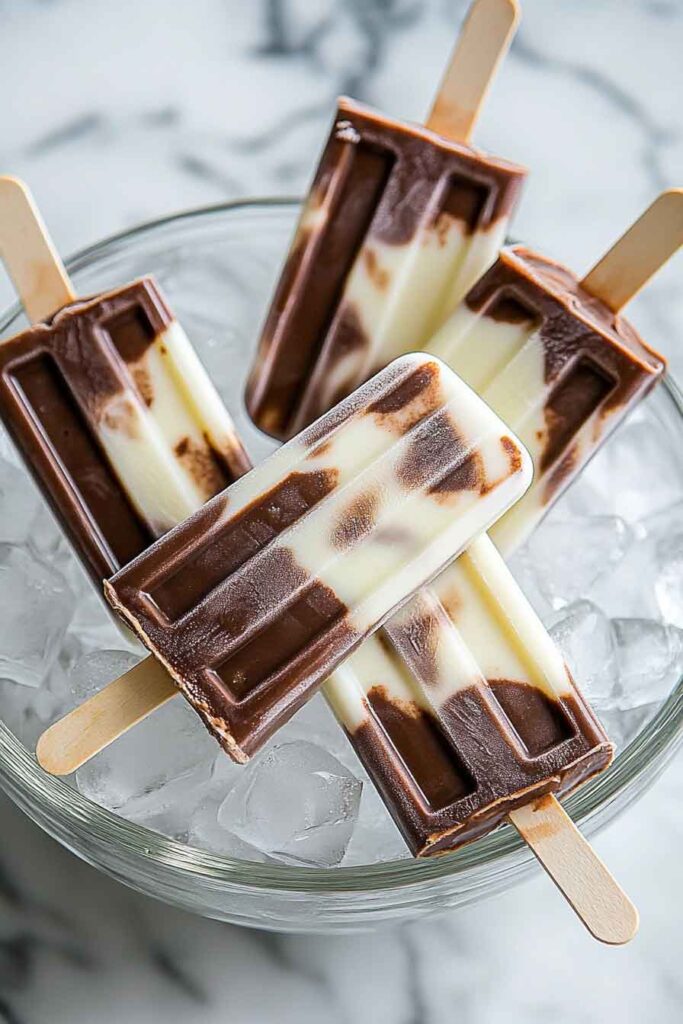
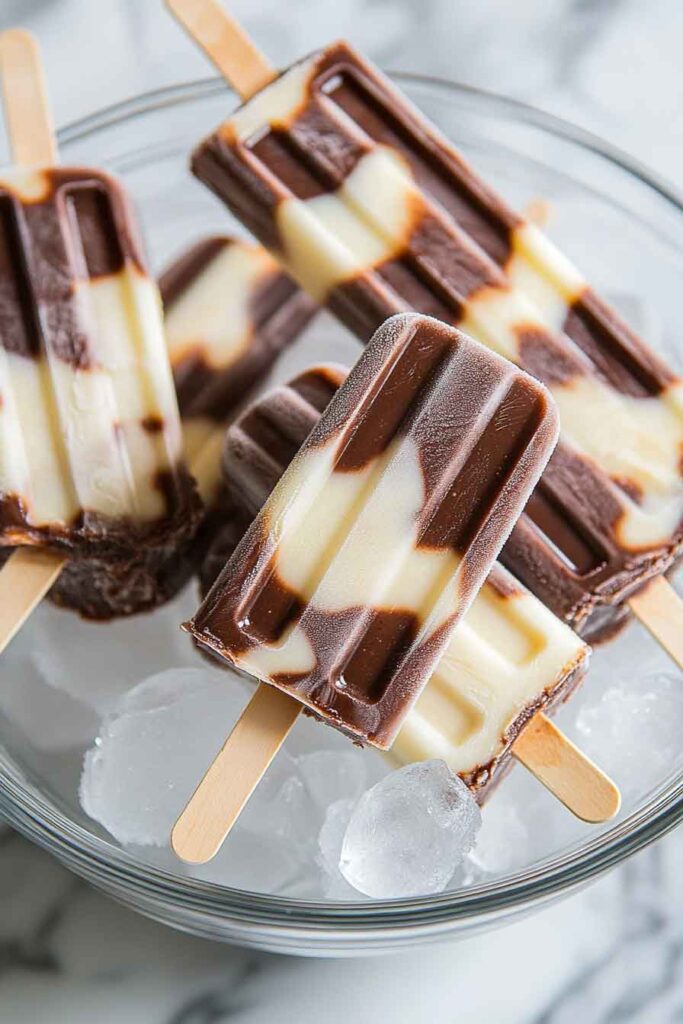
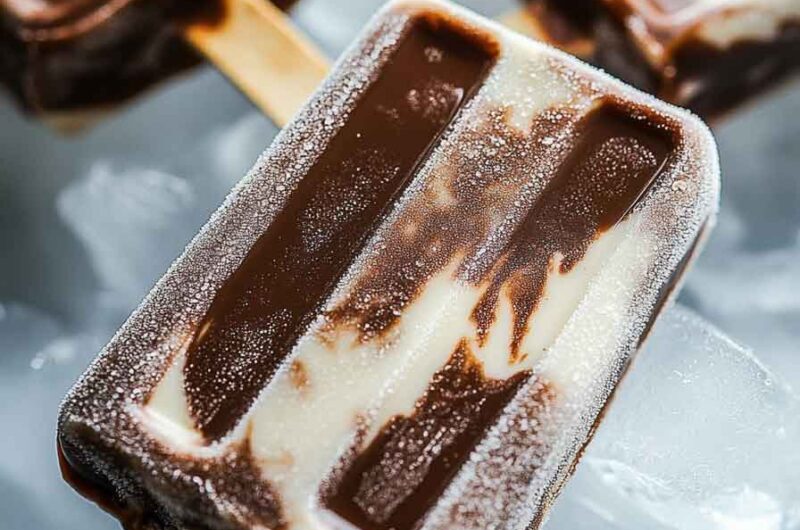
- Chocolate-Vanilla Swirl: Fill half of each mold with chocolate pudding and the other half with vanilla. Use a skewer to gently swirl before inserting sticks.
- Cookies & Cream: Stir crushed chocolate sandwich cookies into vanilla pudding before pouring into molds.
- Banana Split: Use banana pudding with chopped strawberries and mini chocolate chips mixed in.
- Peanut Butter Chocolate: Stir in 2 tablespoons of creamy peanut butter into chocolate pudding before freezing.
- Dairy-Free Version: Use coconut or almond milk with dairy-free instant pudding (though the texture may be softer).
Note: If you add ingredients like cookies or fruit, they should be small and dry to avoid excess water content, which can cause iciness.
How to Make Jello Pudding Pops
Step-by-Step Instructions
Follow these steps carefully for the best texture and flavor:
1. Mix the Pudding
- In a medium mixing bowl, add 1 box of instant chocolate pudding mix.
- Pour in 2 cups of cold whole milk.
- Whisk for about 2 minutes, or until the mixture is smooth, thickened, and free of lumps.
- Set aside.
Repeat this step in a separate bowl using the vanilla pudding mix and remaining 2 cups of milk.
Tip: Pudding thickens quickly. You don’t need to let it fully set before pouring into molds—just make sure it’s smooth and combined.
2. Fill the Popsicle Molds
There are two ways to fill your molds:
Option 1: Solid Flavor Pops
- Pour chocolate pudding into some molds and vanilla into others for simple, solid-flavored pops.
- Fill each mold nearly to the top, leaving about ¼ inch of space for expansion.
Option 2: Swirled Pops
- Alternate spoonfuls of chocolate and vanilla pudding into each mold.
- Use a skewer or thin butter knife to gently swirl the layers (don’t overmix).
Insert sticks into the center of each mold.
3. Freeze the Pops
- Place molds upright in the freezer on a flat, stable surface.
- Freeze for at least 6 hours, or ideally overnight, until completely solid.
If using paper cups: cover each cup with foil and poke the stick through the center. The foil helps keep the stick in place while freezing.
How to Serve Jello Pudding Pops
Once frozen, remove the pudding pops from their molds:
- Run the mold under warm (not hot) water for 10–15 seconds.
- Gently pull the stick to release the pop. If it resists, give it another short rinse.
Serve immediately. These are best enjoyed frozen solid, as they’ll start to soften quickly in warm weather.
Perfect for:
- Afternoon snacks for kids
- Poolside treats or picnics
- Easy make-ahead desserts for parties
Storing Jello Pudding Pops
Proper storage helps retain the creamy texture and prevent freezer burn.
- In Mold: Pops can stay in the mold for up to 1 week if tightly sealed.
- Unmolded: Once frozen solid, remove pops from the mold and wrap each one in plastic wrap or parchment paper. Then place in an airtight freezer-safe container or resealable bag.
- Storage Time: Best within 2–3 weeks for top flavor and texture.
Avoid storing near strongly scented foods like onions or fish, as pops can absorb odors in the freezer.
Tips and Tricks for Success
- Use Whole Milk: Lower-fat milk or non-dairy milk may prevent the pudding from thickening properly.
- Work Quickly: Once the pudding starts to thicken, fill the molds right away before it firms up too much.
- Add Texture: For crunch or flavor contrast, stir in mini chocolate chips, toffee bits, or cookie crumbs.
- Don’t Overfill: Leave a little headspace at the top of the molds so pops don’t overflow as they freeze.
- Flavor Boost: Add a drop of vanilla extract or a pinch of cinnamon to the vanilla pudding mix for extra depth.
Nutrition
Here’s an approximate nutritional breakdown for 1 pudding pop (based on standard ingredients and a 3-ounce mold):
| Nutrient | Amount per Pop |
|---|---|
| Calories | 110 |
| Total Fat | 2.5g |
| Saturated Fat | 1.5g |
| Cholesterol | 10mg |
| Sodium | 200mg |
| Total Carbohydrate | 20g |
| Sugars | 15g |
| Protein | 2g |
| Calcium | 8% DV |
Note: These values may vary based on brand of pudding, milk type, and add-ins.
Jello Pudding Pops
Course: Uncategorized8
servings10
minutes110
kcal6
hourIngredients
1 (3.9 oz) box Chocolate Instant Jell-O Pudding Mix
1 (3.4 oz) box Vanilla or White Chocolate Instant Jell-O Pudding Mix
4 cups cold whole milk, divided (2 cups per pudding mix)
Directions
- Whisk the Pudding:
In two separate bowls, whisk each pudding mix with 2 cups of cold whole milk. Stir for about 2 minutes until smooth and slightly thickened. - Fill Molds:
Pour each flavor into molds separately or alternate them to create swirls. Leave ¼ inch space at the top. Insert sticks. - Freeze:
Place the molds in the freezer upright. Freeze for at least 6 hours, or overnight. - Unmold and Serve:
Run warm water over the molds for 10–15 seconds. Gently remove and enjoy.
Jello Pudding Pops FAQs
Q: Can I use cook-and-serve pudding instead of instant?
A: No. Cook-and-serve pudding requires heat and will not thicken properly with cold milk. Use instant pudding mix only for best results.
Q: Can I use non-dairy milk?
A: You can, but it may not thicken as well. Try almond, oat, or soy milk with caution. The pops may be softer and slightly icy.
Q: How long do they last in the freezer?
A: For best taste and texture, enjoy within 2 to 3 weeks. Wrap each pop to prevent freezer burn.
Q: Can I make them sugar-free?
A: Yes, use sugar-free instant pudding mix and unsweetened almond milk for a lower sugar version. Results may vary in creaminess.
Q: What can I use instead of popsicle molds?
A: Small paper cups work well. Cover with foil and insert sticks through the top to keep them straight while freezing.
Conclusion
Jello Pudding Pops are the kind of dessert that’s hard to mess up but easy to love. Whether you stick with classic chocolate and vanilla or explore your own mix-ins, they’re endlessly adaptable and always satisfying. They’re smooth, creamy, and perfectly chilled—ideal for warm-weather days or just keeping something sweet on hand without needing to bake.
From one home cook to another, this is a freezer treat worth keeping in rotation.