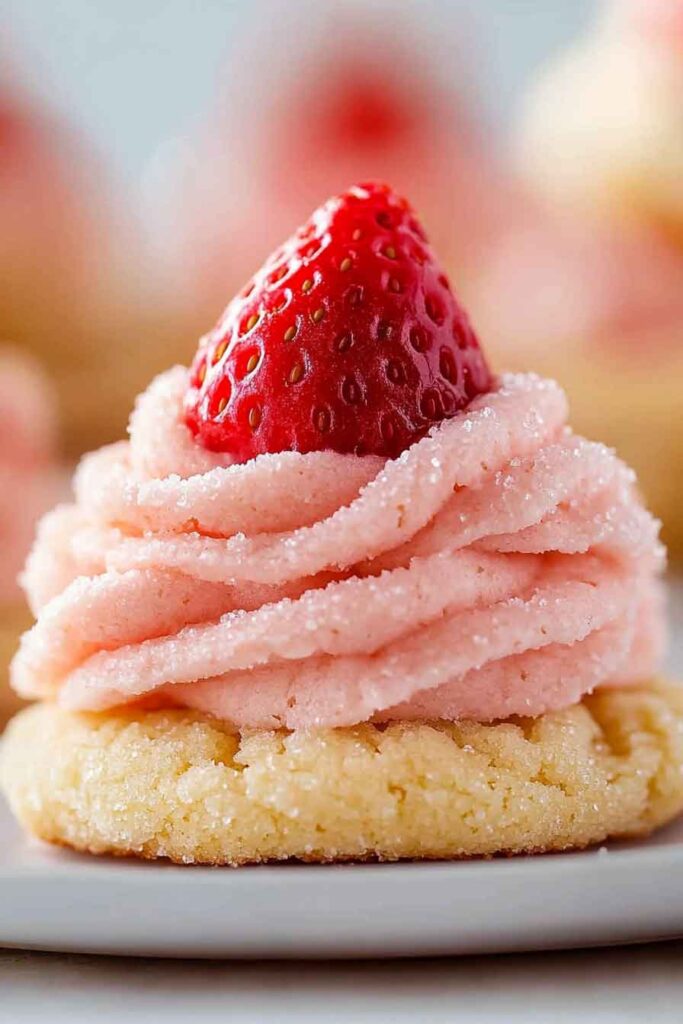
Alright, these strawberry kiss cookies? They’re soft, sweet, and bursting with strawberry flavor—topped with a classic chocolate kiss right in the center. Super cute, super easy, and totally irresistible.
I made them for Valentine’s Day with just a few simple ingredients, including strawberry cake mix. Rolled the dough into little pink balls, baked until puffy, then pressed a chocolate kiss on top while they were still warm. The combo of fruity cookie and melty chocolate? So good.
They’re perfect for holidays, parties, or anytime you want a fun twist on a classic treat. If you love strawberry and chocolate together, this one’s a must-bake. Let’s whip up a batch—you’ll be hooked after the first bite.
Why You’ll Love This Recipe
- Kid-Friendly Baking: Because this recipe starts with cake mix, there’s minimal measuring and little mess, making it ideal for baking with children. Rolling the dough into balls and pressing the chocolate Kiss into each cookie are easy, hands-on steps that kids enjoy.
- Consistent Results: The use of cake mix helps ensure soft, evenly baked cookies every time, even if you’re new to baking.
- Visually Appealing: The bright pink color and shiny sugar coating make these cookies look cheerful and inviting on any dessert table.
- Sweet and Soft: Each cookie has a soft crumb and a slightly chewy edge, paired with the smooth chocolate center from the Kiss.
- Versatile Occasion Cookie: These cookies fit many occasions—Valentine’s Day, birthday parties, baby showers, or just a fun weekend treat.
What You Need to Know Before You Start
Prep Time & Cook Time:
- Prep Time: 15 minutes for mixing and shaping the dough.
- Chill Time: 30 minutes in the refrigerator is recommended to help the dough firm up and prevent spreading in the oven.
- Bake Time: 8 to 10 minutes in a preheated oven.
- Total Time: About 1 hour from start to finish, including chilling and cooling.
Servings:
This recipe makes about 24 medium-sized cookies. If you’re serving a larger group or want leftovers for the next day, you can easily double the ingredients.
Difficulty:
Easy. Even if this is your first time baking cookies, you’ll find each step clear and manageable. Kids ages 4 and up can help with most of the steps, especially rolling and pressing the Kisses into the cookies.
Required Kitchen Tools
- Mixing Bowls: At least two, one for wet ingredients and one for dry.
- Measuring Cups and Spoons: For precise, accurate measurements.
- Whisk or Hand Mixer: For combining the wet and dry ingredients. An electric mixer will make the dough extra smooth, but a sturdy whisk or spoon works too.
- Baking Sheets: At least one large, but two will let you bake more cookies at once.
- Parchment Paper or Silicone Baking Mat: Prevents sticking and helps with even baking.
- Rubber Spatula or Wooden Spoon: For mixing the dough and scraping down the bowl.
- Small Cookie Scoop or Tablespoon: To portion dough evenly.
- Wire Rack: For cooling cookies after baking.
Ingredients for Strawberry Kiss Cookies
Here’s what goes into these cookies and why each ingredient matters:
- Strawberry Cake Mix (15.25 oz box): This provides the base flavor, color, and sweetness, and replaces much of the flour and sugar used in classic cookie recipes.
- All-Purpose Flour (1/4 cup): Gives extra structure to the dough, making it easier to roll and helping the cookies hold their shape as they bake.
- Vegetable Oil (1/3 cup): Moistens the dough and ensures a soft texture after baking.
- Large Eggs (2): Help bind the dough and contribute to the cookies’ soft, tender crumb.
- Milk (2 tablespoons): Loosens the dough slightly for easier mixing and a moist bite.
- Granulated Sugar (for rolling, about 1/2 cup): Creates a sparkly, crisp shell on the outside of each cookie.
- Hershey’s Kisses (24 unwrapped): These are pressed into each cookie just after baking, adding a chocolate center and signature look.
Optional Add-Ins:
- A few drops of red or pink food coloring if you want a deeper pink color.
- Strawberry extract (1/2 teaspoon) for a stronger berry flavor.
- Colored sprinkles for a festive touch.
Variations for Strawberry Kiss Cookies
- Flavor Swaps: Use lemon or chocolate cake mix in place of strawberry for a different taste and color.
- Different Kisses: Try using white chocolate, caramel, or cookies-and-cream flavored Hershey’s Kisses for a fun twist.
- Sugar Alternatives: Roll the dough in colored sanding sugar or sprinkles to change the look for holidays or parties.
- Filling Option: Instead of a Kiss, press a piece of white chocolate or a raspberry jam thumbprint in the center.
- Gluten-Free: Substitute with gluten-free cake mix and gluten-free all-purpose flour if needed.
How to Make Strawberry Kiss Cookies: Step-by-Step Instructions
1. Prepare the Dough
- Mix Dry Ingredients:
In a large bowl, add the strawberry cake mix and all-purpose flour. Whisk or stir until well combined. This helps ensure your cookies bake up evenly, with no dry clumps. - Add Wet Ingredients:
Pour in the vegetable oil, crack in the eggs, and add the milk. If you want a stronger pink color or extra berry flavor, add food coloring or strawberry extract at this point. Mix everything together using a rubber spatula, wooden spoon, or electric mixer on low speed. The dough should be thick, smooth, and slightly sticky.
2. Chill the Dough
- Cover the bowl with plastic wrap and place it in the refrigerator for about 30 minutes. This rest time helps the dough firm up, making it easier to roll and helping the cookies keep their round shape in the oven.
3. Shape and Roll the Cookies
- Line a baking sheet with parchment paper or a silicone mat.
- Pour the granulated sugar into a small, shallow bowl.
- Use a cookie scoop or tablespoon to portion out the dough. Roll each portion into a ball about 1 inch in diameter.
- Roll each dough ball in the granulated sugar until completely coated, then place on the prepared baking sheet about 2 inches apart. This gives the cookies their sparkly, slightly crisp shell.
4. Bake the Cookies
- Preheat your oven to 350°F (175°C) while you shape the dough.
- Bake the cookies for 8 to 10 minutes. The edges should look just set and the centers may look soft. Be careful not to overbake—cookies will continue to firm up as they cool.
5. Add the Hershey’s Kisses
- While the cookies are baking, unwrap your Hershey’s Kisses so they’re ready to go.
- Once the cookies come out of the oven, wait about 1 minute (the cookies will flatten slightly and hold their shape). Gently press a Kiss into the center of each warm cookie. The heat from the cookie will soften the chocolate, but it will set as the cookies cool.
6. Cool the Cookies
- Let the cookies sit on the baking sheet for 5 minutes, then transfer to a wire rack to cool completely. This prevents the chocolate from melting too much and helps the cookies keep their shape.
Serving and Decoration
Strawberry Kiss Cookies are best served at room temperature, allowing the chocolate center to firm up. Arrange the cookies on a platter for parties or stack them in a cookie tin for gifting. Their bright color makes them perfect for holidays and celebrations. For a festive touch, you can drizzle melted white chocolate over the tops, add a dusting of powdered sugar, or sprinkle with colored sugars before baking.
How to Serve Strawberry Kiss Cookies
- Cookie Trays: Place on a large tray with other colorful cookies for a party.
- Gift Bags: Pack in cellophane bags tied with ribbon for birthday treats or classroom parties.
- Lunchbox Treat: Add one to a lunchbox for a sweet surprise.
- With Milk: Enjoy with a glass of cold milk as an after-school snack.
Storing Strawberry Kiss Cookies
- Room Temperature: Store cooled cookies in an airtight container at room temperature for up to 5 days.
- Freezing: For longer storage, place cookies in a single layer on a tray to freeze. Once firm, transfer to a zip-top freezer bag. Thaw at room temperature before serving. The cookies may be frozen for up to 2 months.
- Keep Chocolate Intact: If stacking, place a sheet of parchment or wax paper between layers to keep the Kisses neat and prevent sticking.
Tips and Tricks for Success
- Chill the Dough: Don’t skip chilling—this prevents spreading and makes rolling easier.
- Uniform Size: Use a cookie scoop or measure dough for even cookies that bake at the same rate.
- Do Not Overbake: Cookies should look slightly underbaked in the center; they’ll set up as they cool.
- Prep the Kisses Early: Unwrap Hershey’s Kisses while the cookies bake, so you can press them in while the cookies are still soft.
- Storage: Wait until cookies are fully cool before stacking or storing to keep chocolate looking neat.
Nutrition
| Nutrient | Per Cookie (1 of 24) |
|---|---|
| Calories | 120 |
| Total Fat | 6g |
| Saturated Fat | 2g |
| Cholesterol | 13mg |
| Sodium | 70mg |
| Total Carbohydrate | 16g |
| Dietary Fiber | 0g |
| Sugars | 9g |
| Protein | 1g |
Nutrition is an estimate and may vary based on brand and ingredient variations.
Strawberry Kiss Cookies
Course: Dessert Recipes24
cookies15
minutes8
minutes300
kcal30
miniutesIngredients
1 box (15.25 oz) strawberry cake mix
1/4 cup all-purpose flour
1/3 cup vegetable oil
2 large eggs
2 tablespoons milk
1/2 cup granulated sugar (for rolling)
24 Hershey’s Kisses, unwrapped
Directions
- In a large bowl, whisk together cake mix and flour.
- Add vegetable oil, eggs, and milk. Mix until smooth. Chill the dough for 30 minutes.
- Preheat oven to 350°F (175°C). Line baking sheet with parchment paper.
- Roll dough into 1-inch balls. Coat each ball in sugar. Place 2 inches apart on baking sheet.
- Bake for 8–10 minutes. Cookies should look just set and soft in the center.
- Let cookies cool 1 minute on the tray, then gently press a Hershey’s Kiss into the center of each.
- Cool 5 minutes, then transfer to a wire rack to cool completely.
Strawberry Kiss Cookies FAQs
Can I use a different cake mix flavor?
Yes, you can substitute with lemon, vanilla, or chocolate cake mix for variety.
Do I need to chill the dough?
Chilling helps the dough keep its shape and makes it easier to handle. It’s highly recommended.
Can these cookies be made ahead?
Yes, baked cookies can be stored in an airtight container for up to 5 days, or frozen for up to 2 months.
How do I keep the Kisses from melting?
Let the cookies cool for 1 minute before pressing the Kiss in. Avoid moving cookies until fully cool.
Can I use mini Kisses or other toppings?
Yes, mini Kisses or small chocolate pieces work as well. You can also top with white chocolate or a drizzle of glaze.
Conclusion
Strawberry Kiss Cookies are an easy, kid-friendly treat that blends soft strawberry-flavored dough with a chocolate center. Their bright pink color and simple preparation make them ideal for any celebration, holiday, or as an everyday sweet snack. Whether you bake them for a party, gift, or just to enjoy at home, they’re sure to add a touch of color and a smile to any table.